目录
• 在NAS上部署WireGuard(Peer1) WireGuard是一种近几年新开源的现代化VPN协议,具有高效、轻量和易于配置的特点。它通过使用最新的加密技术,提供了强大的安全性和隐私保护。WireGuard的代码库非常简洁,易于审计和维护,因此被广泛认为比传统的VPN协议(如OpenVPN和IPSec)更安全和高效。
本文介绍如何使用WireGuard搭建VPN环境,实现在外部网络环境下远程访问家庭内网。
网络环境 • 公网服务器 :具有固定公网IP的Linux服务器,作为WireGuard网络的中枢节点 • NAS :通过Docker运行WireGuard客户端,连接公网服务器 • 笔记本 :模拟通过手机5G热点(外部网络)连接公网服务器,通过VPN访问家庭内网 网络拓扑 WireGuard隧道
WireGuard隧道
路由转发
路由转发
Linux服务器固定公网IPWireGuard Hub中继 前置要求 检查内核支持 在公网服务器和NAS上检查WireGuard内核模块支持:
# 检查内核模块是否已加载
~ lsmod | grep wireguard

# 尝试加载模块
~ sudo modprobe wireguard

# 检查内核版本
~ uname -r

# 查看模块信息
~ modinfo wireguard
如果内核不支持,需要升级内核,虽然 wireguard 也可以运行在 用户态 [1] ,但性能较差, CentOS 7 操作系统升级内核可以参考 CentOS 7 升级内核 [2]
部署步骤 部署 WireGuard 有很多方式,社区还有一些 wg-easy [3] 等快速部署的项目可以使用
这里为了熟悉 WireGuard 的配置细节以及了解常见的部署方式,主要按照以下步骤进行:
• 在公网服务器上为了尽可能减少性能损耗,使用原生部署方式来运行 WireGuard 中继 • NAS 系统由于是定制化系统,采用 Docker Compose 方式运行 linuxserver/wireguard [4] 容器,尽量不对系统造成影响 对于 WireGuard 的网络地址,可以使用一些 保留地址 [5] ,不与当前局域网冲突即可,这里选用 192.168.100.0/24
在公网服务器上部署WireGuard 开启ip转发 ip 转发是Linux网络中的核心功能,允许数据包在网络接口之间进行转发,从而实现不同网络之间的数据传输
# 设置ip转发
~ echo "net.ipv4.ip_forward = 1" >> /etc/sysctl.conf
# 应用更改
~ sysctl -p
安装WireGuard 上面对服务器内核升级后,系统已经内置了 WireGuard 内核模块,只需要安装 wireguard-tools 工具包
~ yum install wireguard-tools -y 配置 首先生成密钥对,生成后默认保存在 /etc/wireguard 目录下,这里有两个客户端, peer1 和 peer2 ,因此需要生成两对密钥
# 生成服务器端密钥对
wg genkey | tee server_privatekey | wg pubkey > server_publickey
# 生成客户端密钥对,有几个客户端就生成几个,后面如果新增客户端需要生成新的密钥对
wg genkey | tee client1_privatekey | wg pubkey > client1_publickey
wg genkey | tee client2_privatekey | wg pubkey > client2_publickey
然后在 /etc/wireguard 目录下创建一个名为 wg0.conf 的配置文件,内容如下
[Interface] PrivateKey = xxxxx ## 服务端私钥 Address = 192.168 . 100.1 ## 服务端虚拟IP PostUp = iptables -A FORWARD -i wg0 -j ACCEPT ; iptables -A FORWARD -o wg0 -j ACCEPT; iptables -t nat -A POSTROUTING -o eth0 -j MASQUERADE ## 启动时添加iptables规则:(入站规则)允许通过wg0接口进行数据包转发,eth0为主网卡,对应服务器的公网EIP;(出站规则)允许通过wg0接口进行数据包转发,eth0为主网卡,对应服务器的公网EIP;对从wg0接口发出,通过eth0接口出去的数据包进行源地址NAT转换 PostDown = iptables -D FORWARD -i wg0 -j ACCEPT ; iptables -D FORWARD -o wg0 -j ACCEPT; iptables -t nat -D POSTROUTING -o eth0 -j MASQUERADE ## 停止时删除iptables规则,避免iptables规则重复,即删除上面添加的入站、出站、NAT转换的规则 ListenPort = 51999 ## WireGuard监听端口,UDP协议,默认是51820 [Peer] PublicKey = xxxxx ## peer1公钥 AllowedIPs = 192.168 . 100.2 / 32 , 192.168 . 50.0 / 24 ## 允许peer1访问的IP地址,包括WireGuard NAS虚拟ip和家庭局域网网段。用大白话来说,AllowedIPs 就是“这些 IP 地址可以通过这个 peer 访问”。它是“带有这个 peer key 的数据包,其源 IP 属于这些网络之一,是被允许的”。Wireguard 本身不做路由,但是像wg-quick这样的辅助程序,移动客户端或者 Windows 客户端会改变路由表。 [Peer] PublicKey = xxxxx ## peer2公钥 AllowedIPs = 192.168 . 100.3 / 32 ## 允许peer2访问的IP地址,peer2的虚拟IP,这里不需要反过来通过peer1访问peer2的其他局域网设备,因此仅填写peer2的虚拟IP 修改文件权限 ~ chmod 600 /etc/wireguard/* 启动服务 ~ wg-quick up wg0 # 启动wg0接口 ~ wg show wg0 # 查看状态 interface: wg0 public key: xxxx private key: (hidden) listening port: 51999 peer: xxxx allowed ips: 192.168.100.2/32, 192.168.50.0/24 peer: xxxx allowed ips: 192.168.100.3/32 ~ ifconfig wg0 # 启动后会运行一个wg0的虚拟网卡 wg0: flags=209<UP,POINTOPOINT,RUNNING,NOARP> mtu 1420 inet 192.168.100.1 netmask 255.255.255.255 destination 192.168.100.1 unspec 00-00-00-00-00-00-00-00-00-00-00-00-00-00-00-00 txqueuelen 1000 (UNSPEC) RX packets 0 bytes 0 (0.0 B) RX errors 0 dropped 0 overruns 0 frame 0 TX packets 0 bytes 0 (0.0 B) TX errors 0 dropped 0 overruns 0 carrier 0 collisions 0 ~ wg-quick down wg0 # 停止wg0接口 除了手动启动外, wg-quick 工具提供了 systemd 服务单元,可以通过 systemctl 命令来管理
~ systemctl status wg-quick@wg0 # 查看状态
~ systemctl start wg-quick@wg0 # 启动
~ systemctl stop wg-quick@wg0 # 停止
~ systemctl restart wg-quick@wg0 # 重启
~ systemctl enable wg-quick@wg0 # 设置开机启动
配置防火墙及安全组 如果服务器配置了安全组规则及防火墙规则,则需要放行上面定义的 ListenPort/UDP 端口
到这里,服务端已经配置完成,下面开始部署客户端
在NAS上部署WireGuard(Peer1) 创建项目目录 ~ mkdir wireguard-nas && cd wireguard-nas 创建docker-compose配置 version: '3.8' # Docker Compose文件版本 services: wireguard: # 服务名称 # 使用linuxserver/wireguard镜像,详情可以查看官方文档 image: lscr.io/linuxserver/wireguard:latest # 容器名称,便于管理和调试 container_name: wireguard-nas # 添加必要的Linux capabilities cap_add: - NET_ADMIN # 允许网络管理操作(配置接口、路由等) - SYS_MODULE # 允许加载内核模块(WireGuard内核模块) # 系统级配置参数(如果启动报错,可以注释掉下面的sysctls配置) sysctls: - net.ipv4.conf.all.src_valid_mark=1 # 允许修改数据包标记,用于路由策略 # 环境变量配置 environment: - PUID=1000 # 容器内进程用户ID,与宿主机用户保持一致 - PGID=1000 # 容器内进程组ID,与宿主机用户组保持一致 - TZ=Asia/Shanghai # 时区设置 - PEERDNS=auto # 自动配置DNS服务器 - INTERNAL_SUBNET=192.168.100.0 # WireGuard内部网段 - LOG_CONFS=true # 启用配置文件日志记录 # 数据卷挂载 volumes: - ./config:/config # 配置文件目录,持久化存储 - /lib/modules:/lib/modules:ro # 只读挂载内核模块目录,支持内核态WireGuard # 重启策略 restart: unless-stopped # 除非手动停止,否则自动重启 # 网络模式 network_mode: host # 使用宿主机网络,避免Docker网络层开销,提升性能 生成配置 启动容器,初始化配置文件
~ docker-compose up -d 查看容器挂载的 config 目录下生成的文件结构,可以看到生成了模板 template 目录及文件,以及一个 wg_confs 的空目录
~
tree ./config/ -L 2
config
├── coredns
│   └── Corefile
├── templates
│   ├── peer.conf
│   └── server.conf
└── wg_confs
NAS作为客户端,容器启动后只会生成基本的目录结构,不会生成完整的WireGuard配置。需要手动创建配置文件
~ vim ./config/wg_confs/wg0.conf
[Interface]
PrivateKey = xxxx  ## peer1的私钥,需要从公网服务器的./config/peer1/privatekey-peer1获取
Address = 192.168.100.2/24  ## peer1的虚拟IP

[Peer]
PublicKey = xxxx  ## 服务器的公钥,需要从公网服务器的./config/server/publickey-server获取
Endpoint = xxxx:51999  ## 服务器的公网IP和端口
AllowedIPs = 192.168.100.0/24  ## 允许访问的WireGuard网段
PersistentKeepalive = 10  ## 保持连接活跃,防止超时
启动服务 配置完成后,正式启动 NAS 端的 WireGuard 服务
~ docker-compose restart # 检查容器状态 ~ docker-compose ps # 查看日志看是否报错 ~ docker-compose logs -f **** As the wireguard module is already active you can remove the SYS_MODULE capability from your container run/compose. **** **** If your host does not automatically load the iptables module, you may still need the SYS_MODULE capability. **** **** Client mode selected. **** [custom-init] No custom files found, skipping... **** Disabling CoreDNS **** **** Found WG conf /config/wg_confs/wg0.conf, adding to list **** **** Activating tunnel /config/wg_confs/wg0.conf **** Warning: `/config/wg_confs/wg0.conf ' is world accessible [#] ip link add dev wg0 type wireguard [#] wg setconf wg0 /dev/fd/63 [#] ip -4 address add 192.168.100.2/24 dev wg0 [#] ip link set mtu 1420 up dev wg0 **** All tunnels are now active **** [ls.io-init] done. 配置外部笔记本(Peer2) 外部笔记本需要使用peer2的配置进行连接,先编辑一个配置文件内容
[Interface]
PrivateKey = xxxxx ## peer2的私钥,需要从公网服务器的./config/peer2/privatekey-peer2获取
Address = 192.168.100.3/24  ## peer2的虚拟IP

[Peer]
PublicKey = xxxxx ## 服务器的公钥,需要从公网服务器的./config/server/publickey-server获取
Endpoint = xxxx:51999  ## 服务器的公网IP和端口
AllowedIPs = 192.168.100.0/24, 192.168.50.0/24  ## 允许访问的WireGuard网段和家庭局域网
PersistentKeepalive = 10  ## 保持连接活跃,防止超时
安装WireGuard Windows/macOS :
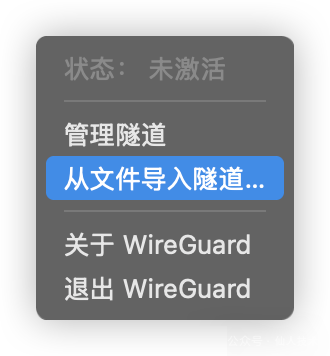
• 下载官方WireGuard客户端:https://www.wireguard.com/install/ 导入配置 在 WireGuard 客户端中导入上面编辑的配置文件
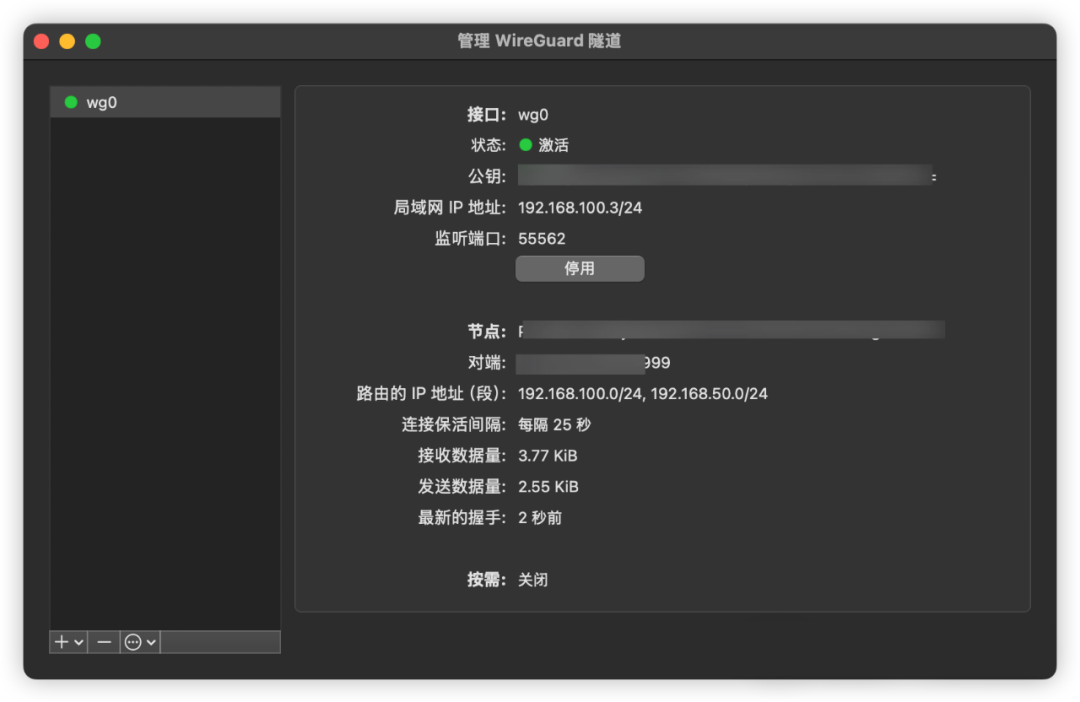
启动连接 导入后点击管理隧道,点击启动(启动前别忘了切换笔记本连接热点,使网络不与家庭网络在一起)
配置家庭网络路由或NAT 完成了上面的服务端、NAS端(peer1)、笔记本(peer2)的配置后,基本上已经可以通过 VPN 从笔记本访问 NAS 了,这里还剩下最后一步,也就是 需要使笔记本(peer2)能通过 VPN 访问家庭局域网的其他设备
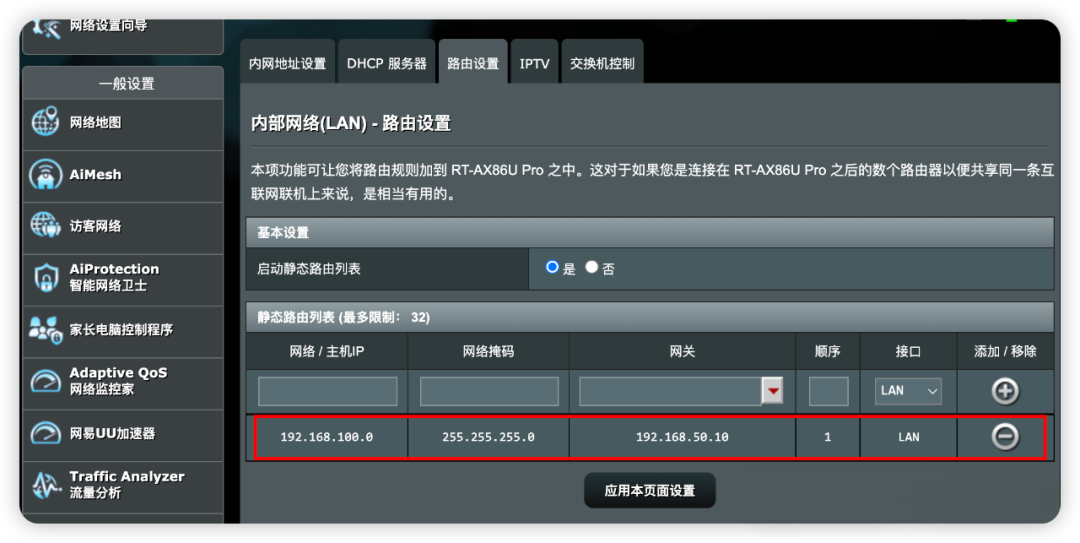
主要有两种方式:一种是使用 NAT ,另一种是使用静态路由,下面分别介绍和说明:
• NAT :和上面的服务端配置类似,需要在 NAS 端的 WireGuard 配置中添加 PostUp 和 PostDown 规则,目的是为了将来自 WireGuard 的 192.168.100.0/24 网段进行地址转换后访问到家庭局域网 • 静态路由:静态路由是指将 WireGuard 的 192.168.100.0/24 网段路由到家庭局域网,即将 WireGuard 的 192.168.100.0/24 网段配置到局域网路由表中,这样就省去了 NAT 的开销 这里以静态路由举例,可以把路由配置到家中的路由器上,以我使用的 ASUS RT-AX86U Pro 为例,添加静态路由,把 WireGuard 的 192.168.100.0/24 网段路由到 NAS 主机
验证连接 检查WireGuard状态 # 在公网服务器上 ~ wg show wg0 interface: wg0 public key: xxxxx private key: (hidden) listening port: 51999 peer: xxxxx endpoint: xxxxx:4503 allowed ips: 192.168.100.2/32, 192.168.50.0/24 latest handshake: 15 seconds ago transfer: 196.93 KiB received, 132.02 KiB sent peer: xxxxx endpoint: xxxxx:55562 allowed ips: 192.168.100.3/32 latest handshake: 2 minutes ago transfer: 83.53 KiB received, 83.42 KiB sent # 在NAS上 ~ docker exec -it wireguard-nas wg show interface: wg0 public key: xxxxx private key: (hidden) listening port: 36018 peer: xxxxx endpoint: xxxxxx:51999 allowed ips: 192.168.100.0/24 latest handshake: 18 seconds ago transfer: 1.26 MiB received, 9.25 MiB sent persistent keepalive: every 25 seconds 测试连通性 # 从NAS(peer1) ping公网服务器 ping 192.0.2.1 # 从公网服务器ping NAS(peer1) ping 192.0.2.2 # 从外部笔记本(peer2) ping公网服务器 ping 192.0.2.1 # 从外部笔记本ping NAS(peer1) ping 192.0.2.2 # 从笔记本(peer2) 测试家中局域网访问 ping 192.168.50.1 # 家中路由器IP 常见问题排查及其他 连接失败 # 检查容器日志 docker-compose logs wireguard # 检查WireGuard状态 docker exec -it wireguard-server wg show # 检查防火墙规则 sudo iptables -L -n 网络不通 # 检查IP转发 cat /proc/sys/net/ipv4/ip_forward # 检查路由表 ip route show # 检查网络接口 ip link show 如果还是有问题,可以尝试抓包排查
性能问题 # 检查是否使用内核模块 lsmod | grep wireguard # 检查MTU设置 ip link show wg0 # 调整MTU值(在配置文件的[Interface]块中添加) MTU = 1420 # 启用多队列 sudo ethtool -L eth0 combined 4 容器启动失败 如果遇到以下错误:
failed to create task for container: failed to create shim task: OCI runtime create failed: runc create failed: sysctl "net.ipv4.conf.all.src_valid_mark" not allowed in host network namespace 解决方案 : 注释掉有问题的 sysctls 配置:
# 注释掉整个sysctls部分
# sysctls:
#   - net.ipv4.conf.all.src_valid_mark=1
在宿主机上手动设置该参数:
# 在宿主机上设置
sudo sysctl -w net.ipv4.conf.all.src_valid_mark=1

# 永久生效
echo 'net.ipv4.conf.all.src_valid_mark=1' | sudo tee -a /etc/sysctl.conf
sudo sysctl -p
配置DNS # 在peer配置中添加DNS服务器,如果使用ip连接,这个应该没什么用 DNS = 8.8.8.8, 8.8.4.4 wg常用命令 # 查看所有WireGuard接口 wg show # 查看特定接口 wg show wg0 # 查看接口详细信息 wg show wg0 dump # 启动接口 wg-quick up wg0 # 停止接口 wg-quick down wg0 # 重新加载配置 wg syncconf wg0 <(wg-quick strip wg0) 引用链接 [1] 用户态: https://www.netmaker.io/resources/kernel-module-vs-user-space-wireguard [2] CentOS 7 升级内核: https://www.ssgeek.com/docs/linux/system/centos/centos7-upgrade-kernel [3] `wg-easy`: https://github.com/wg-easy/wg-easy [4] `linuxserver/wireguard`: https://github.com/linuxserver/docker-wireguard [5] 保留地址: https://zh.wikipedia.org/wiki/%E4%BF%9D%E7%95%99IP%E5%9C%B0%E5%9D%80


 400 186 1886


